The Invention Test @ Malaysia's Blogger MasterChef Semi-Finals

So, after we drew our numbers, we went into the kitchen to find our respective cooking stations and prepare for the Invention Test. I was very pleased with the cooking station that I got.... I think I got the workstation with the most space. My lucky stars must be shining on me :)

Each of us got a MasterChef Malaysia apron to put on


My workstation and the box of mystery ingredients

So what is an Invention Test? A mystery box with one main ingredient will be given to each contestant and the contestants must invent and cook a dish in 45 minutes from scratch.

The invention test may look easy on TV, but trust me.. it is NOT. Firstly, you have to work in a kitchen you are unfamiliar with - we weren't given a tour of the kitchen and had to find our own way around it.At home, I could cook at my own leisure and had all the ingredients I needed for a recipe/dish available to me.Herbs and dairy products were provided here but in limited amounts, basically you need to be very quick and grab all the ingredients that you need. I had wanted to make a minty pineapple salad, but couldn't get my hands on any lime so I had to ditch that idea. We also had pretty limited kitchen tools ie 1 frying pan, 1 spoon, 2 bowls etc so had to just work with what we were given and make the best out of it. With only 45 minutes given to us, I definitely felt the pressure.
A nd the mystery ingredient that we got was..... PRAWNS! We were given 8 prawns each, and luckily, they were really fresh.


We were told to use as many ingredients as we could from the mystery box and also all the prawns given to us.I was actually quite pleased with the selection of fruits and vegetables given to us, very colorful.

Box of mystery ingredients

At each workstation, contestants would be given these basic cooking ingredients - cooking oil, vinegar, tomato ketchup, mustard, salt and pepper. I quickly grabbed some herbs, sugar and olive oil from the communal stash at the other end of the kitchen.


Big, fresh prawns

I like the apron very much, but we weren't allowed to take them home...


To be honest, I didn't even know what other equipments were provided to us here. I just stuck to my frying pan, chopping board and knife, too busy to walk around the kitchen to look for things. Only when I came home and saw the photos did I know what was available.

Cute mixer

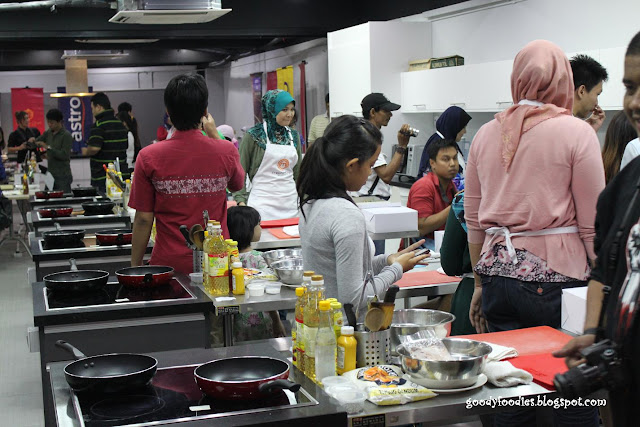
Very busy kitchen - contestant's friends and family were allowed in to watch and take photographs.

Contestants busy preparing

I was at the front of the kitchen, but I didn't have much time to look around and see what the other contestants were up to! The clock is ticking... tick tock tick tock..


What were the contestants cooking? So many possibilities...

Someone was boiling potatoes

One was seen dicing her prawns


One was making a special sauce for their prawns

Mmmm I wonder what he is doing..


Fry them


Cook a sauce perhaps?


Meanwhile, I was deveining my prawns..

Still deveining

Haha I must be the slowest prawn-deveiner in MasterChef history...

Still not done.. lol


Finally done! I then marinated the prawns with some "mystery ingredients"...

Everyone concentrating hard


Really quiet outside at the main reception

Judges table

Soon to be very busy in here

The sponsors for this contest

Time to plate up my vegetables.. I tried to use as many of them as possible to create a colorful dish... carrots, zucchini, pineapple, red pepper..


Prawns marinating nicely... and I'm tearing the curry leaves into the olive oil/butter mixture in the frying pan..

Infusing the garlic butter oil with curry leaves.... smells good!

Time to plate the food... some other contestants dishes ready for plating...


Putting the finishing touches to my dish...

Everyone off to the judging room

Next up, all the contestant's dishes and what the judges had to say about my prawn dish. Can you guess what I cooked?

Click here to see full set of photos.

*************************

The actual cooking show, MasterChef Malaysia premieres on 22nd October 2011 at 9.00pm on Astro Ria (Channel 104). It will air every Saturday - Wednesday and the Master Class will be on every Friday 9.00pm.


Baked Quinoa Patties

On the subject of packing food for airplane flights, it appears that a number of you were curious about how I go about it. The specifics. So I thought I'd share a few more photos, and include a more detailed explanation. My lunch-on-the-go is an ever-evolving system which (currently) involves a collapsible container, two thick rubber bands, and a plastic fork/spoon thing. All food goes in one container, and I avoid anything liquid to get through security. A good splash of sauce seems to be fine though. For my flight to London, I packed the potstickers I shared last week. What you didn't see was the way I buried them under a layer of these baked quinoa patties. I'll tack on the recipe for those down below.

Baked Quinoa Patties

Now, I'm not typically a fan of squishy silicone products. But I like a number of things about this lunch container. It's reusable. And when it's not full it collapses down to nothing in my luggage. The best thing? It has yet to leak. The quinoa patties are sort-of an herby, vegged-up, baked version of the Tiny Quinoa Patties in Super Natural Every Day - dotted with feta and flecked with lots of dill, chives, and kale. I used a folded piece of parchment paper to divide the dumplings from the patties.

Noodles and tofu are another favorite flight combo. Something like the Otsu recipes in either Super Natural Cooking or Super Natural Every Day. They're flavorful, not overly saucy, and I like being able to get a nice mix of noodles, vegetables, and some protein in one bowl. Frittatas, burritos - same thing.

Baked Quinoa Patties

As I'm typing, I'm making my way back home. This morning was a blur of motion - escalators, elevators, and people-movers. A trek with luggage from the hotel to the subway, then subway to train, train to airport. Next up - the flight to San Francisco. In the meantime, here are a few snapshots from the past week.

Baked Quinoa Patties

I'll do my best to type up a list of some of my favorite London spots soon (and update my Paris map as well). The food has been incredibly inspiring, and I feel like I've barely put a dent in the list of places I wanted to visit. Before I make my way home though I want to thank Heather And Tina, Anna, Brian, Keiko, Yotam, Clotilde, Maxence, Dorie, Michael and everyone else for the warm welcome - and for all the tips, pointers, and insights that helped make this trip extra special. xo-h

Continue reading Baked Quinoa Patties...


High Fiber Foods: The Key to Heart and Digestive Health

Everyone knows that fiber is good for digestion. With tons of TV ads and commercials promoting fiber rich supplements, the point has been made clear to the public.

High Fiber Foods

The good news is you dont need to buy supplements to get fiber working in your body; it comes naturally from the regular food that we eat. All that needs to be done is identify these High Fiber Foods and consume them on a regular basis.

High Fiber Foods and Digestive Health

The fiber that we consume by eating fruits and vegetables are called dietary fiber. These mainly come from plants. Since our body cannot process fiber, it goes down to the colon to maintain regularity. It also helps prevent constipation.

There are 2 types of dietary fiber: insoluble fiber and soluble fiber.

Insoluble fiber pertains to fiber that does not dissolve in liquid. This fiber moves in the digestive tract and acts as a binder that increases the stools volume. Some of the common sources of this fiber are whole grain foods and nuts.

Soluble fibers, on the other hand, can take-in water. This helps to form the texture of the stool. Most fruits are rich in soluble fiber.

High Fiber Foods and Heart Health

Fiber also plays a part in maintaining a healthy heart. Studies show that people who take more fiber in their diet have lesser CRP in their body; CRP stands for C Reactive Protein which is associated to heart disease. This has also been identified as one of the factors that causes stroke.

High Fiber Foods List:

Here is a list of foods that are high on fiber.

Fruits

  • Grapefruit
  • Orange
  • Apricots
  • Strawberries
  • Apples
  • Pear
  • Ba nana
  • Blueberries
  • Figs
  • Peaches
  • Avocado
  • Raspberries

Vegetables

  • Beets
  • Green beans
  • Kale
  • Broccoli
  • Cabbage
  • Carrot
  • Spinach
  • Cauliflower
  • Onions
  • Brussels sprouts
  • Peas
  • Corn

Nuts

  • Pistachio
  • Pumpkin seeds
  • Walnuts
  • Almonds
  • Peanuts

Whole Grains

  • Whole Wheat Pasta
  • Bran cereal
  • Brown Rice
  • Oats

If You enjoyed this post, you might like:


Joe can cook! Season 2 Episode 3: Salmon Don with Skin

This is technically not the hardest of recipes, matter of fact, the only cooking required is putting the salmon skin in the oven. However, having not used the DSLR for months and letting it rot in a black box in a corner of the unit, I couldn't resist taking it out for a few snaps.


It looks like the camera is still serving me well and looking at my own pictures, I would love to dig into a bowl of this for lunch.

IMG_4372

Once too often, we find ourselves paying AUD 15-20 for a bowl of rice topped with some salmon sashimi but can we not make it ourselves for a much cheaper price?

IMG_4368

It looks like we can! Excuse my ignorance but for the longest times I have been going to fishmongers looking out for sashimi quality salmon. Until one day, I couldn't take it anymore and asked, where can I get some. Guess what? The whole salmon that I was buying is sashimi grade to begin with! For AUD 25 per kg, the 3 kg salmon can yield a lot of sashimi I tell you!

Best discovery is finding whole salmon for AUD 15 per kg at Yuen's market in the Valley that is according to them is also sashimi grade!

How to assemble:

1. What we do is usually cut the belly section out for eating sashimi and it actually makes it easier to portion the rest out evenly.

2. Cut the skin out, seasoned with salt and pepper and pop it in the oven on grill mode till it crisps up like a cracker.

3. Cook some Japanese / Korean short grain rice, cool down and mix with some rice vinegar (the one meant for sushi).

4. Assemble everything together like the picture.

Voila! You have got a pretty good healthy meal!

Suitable for Framing II: Famous Garlic and a Market

David_hagerman_taskopru_garlic_inebolu

Famous Takpr garlic, Turkey, October 2011

David_hagerman_mardin_market
Market in Mardin, Turkey, June 2010

This is the second post in a series that we're running every Tuesday through early December.All images in the series are for sale, via Photoshelter or directly from Dave.

To learn more about the series visit the first post, here. Images can be viewed full screen in Dave's Suitable for Framing gallery, here.

About the photographer:

David Hagerman is an editorial and commercial photographer specializing in food, travel, portraiture and street photography. His work has appeared in the New York Times, Saveur, Food & Wine, Travel+Leisure Southeast Asia, Wall Street Journal and other publications.When not on assignment or otherwise gainfully occupied Dave offers private photography workshops in Penang and elsewhere. Contact him at drhagerman@gmail.com.


Coconut Panna Cotta In Sugar Nest


What could I do to lift a panna cotta up from its present state of being old school and overdone, I wondered? I've always wanted to make a sugar nest (spun sugar) but sugar and chocolate craft are very alien to me. Besides, I don't have a candy thermometer and the weather here's extremely humid.

When I was in London last year, Tina, who reads my blog, contacted me and we met, got on like old friends and I even scored a stay with her and her very hubby in their beautiful home near Heathrow Airport. Tina used to own a Peranakan restaurant in Singapore and she is such an excellent and super efficient cook that I felt embarrassed for myself. I hope she never comes for dinner!

Last Saturday,Tina called me from London to confirm our date sometime in December. She was excited for me about the Jelliriffic! challenge and when I told her how I wanted to make a spun sugar nest but don't have a thermometer, she offered to send me a candy thermometer (can't find one here) but I couldn't wait so she insisted that spun sugar can be done, "just check for the soft ball stage". Thanks to her encouragement, I made spun sugar today and although the results are not as fine as I wanted, I'm very thrilled that I finally did it. There's more refinement to do but for now, I am happy that my first attempt was not a failure. And you know, friends like Tina (and many more; you know who you are!) are the reason I continue to blog. I've met so many wonderful people through this blog.

I've seen a video where a sugar nest was spun over a metal mould and it looked really beautiful. After the ! photos w ere taken of the panna cotta walled by the sugar nest, I re-heated the sugar to shape another nest on the mould. It didn't work. The sugar pulled in drippy strands and worse, it stuck to the greased mould. I re-heated the sugar, wrapped the mould with foil, greased it, hoping to pull the foil off once the sugar hardened but the sugar stuck again to the foil. I had re-heated the sugar many times and it was getting more and more burnt. In the end, I gave up but am sure that one day I will spin a sugar nest over a mould. It can be done.

If you've never made panna cotta, make it! It's the easiest dessert to make (just boil cream with gelatine, set it, make a sugar syrup or if you are adventurous, make spun sugar and you will turn a plain-looking dessert into a stunning showpiece. Try it and thank me.

Coconut Panna Cotta In Sugar Nest
The Panna Cotta:
100 ml fresh thick coconut milk
100 ml dairy cream
1 1/2 piece gelatine leaves
1. Soften the gelatine leaves in room temperature for a couple of seconds. Drain.
2. Put the cream, coconut milk and gelatine into a small pot and heat, stirring all the time, until the gelatine is melted. Do not let it boil. Remove, let cool for a few minutes and pour into rinsed Jelliriffic! moulds. Cover with wrap and chill until set.
The Sugar Nest:
1/4 cup coarse sugar
1/8 cup light corn syrup
1/8 cup water
1. Put a handful of ice cubes and a cup of water into a big bowl. Place 2 or 3 pots or frying pans with long handles sticking out over the counter. Place newspapers on the floor to catch sugar drips. Wear an apron.
2. Put sugar, corn syrup and water into a small pot and let simmer without stirring. After about 15 minutes, the sugar will turn light golden and syrupy. If you have a candy thermometer, it should reach 310 F. Remove and plunge the pot into the basin of cold water to stop the cooking. The sugar will thicken further upon cooking.
3. Dip a fork into the sugar syrup, draw! the for k over the handles of the pans to and fro. At first the strands will be very thin and wispy. After a while, the sugar strands will build up. You can re-heat the sugar if it gets too thick to spin. When done, lift the spun sugar off the handles and wrap it around the panna cotta. Spun sugar hardens quickly so it will break easily.
4. Wrap the panna cotta with the spun sugar. Voila! A show stopper!